
There are may be users who are looking for an answer the question, “How do I Uninstall and Reinstall Internet Explorer 11 in Windows 10?” So, if you really don’t like it and want to get rid of it, then you must read this article.
Finally, Microsoft released its latest version of Windows, i.e. Windows 10. It comes with lots of cool new features including a new Start Menu, Cortana Integration, and the new browser called Microsoft Edge Browser, but Internet Explorer is still available in Windows 10 so that users who encounter compatibility issues can use either platform.
Just like Windows 7, Windows 8 and Windows 8.1 Microsoft added Internet Explorer 11 into the Windows 10 system files and forced users to use one of the worst inventions of Microsoft.
Microsoft has already introduced its new browser, named Microsoft Edge, which serves as a replacement to Internet Explorer. Microsoft Edge is new and introduced in Windows 10 with lots of cool features like the clear browser cache, dark theme, changes default search engine, and a lot more. This browser is still in beta and back-end team is working very hard to add more features like installing extensions in the browser, just like other modern browsers.
Microsoft Edge is the default web browser in Windows 10, and I’m sure lots of Windows 10 users definitely want to completely remove the Internet Explorer because there is no specific reason to keep this browser in the amazing operating system created by Microsoft.
Also after this update, Internet Explorer can also be removed from Windows 10. If you don’t want Internet Explorer 11 on your system, you can uninstall it.
Now the question is how do I uninstall Internet Explorer if I don’t know where the heck is Internet Explorer in Windows 10? Actually, the reason you don’t see Internet Explorer on our Programs and Features listing because it’s a core part of the operating system and is not a program which is installed in Windows.
But this doesn’t mean that you cannot uninstall Internet Explorer out of your Windows 10 installation. In this article, you will read how to uninstall and reinstall Internet Explorer in Windows 10.
Steps to Uninstall Internet Explorer 11 Completely in Windows 10
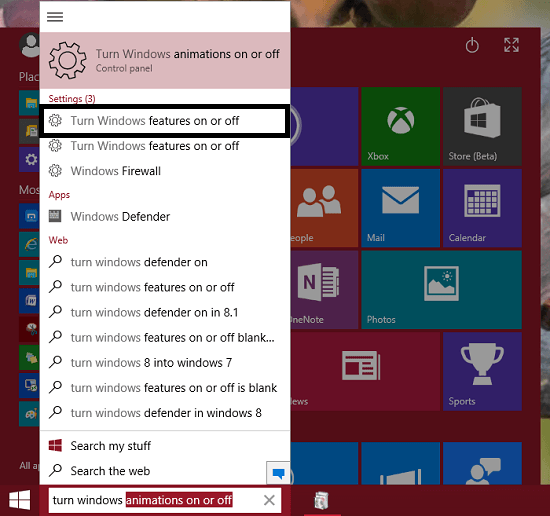
1. The first thing you need to do is open Turn Windows features on or off and for that use the search feature. In search box just type Turn Windows Features On or Off and once you see this option in the search bar, click to open it.
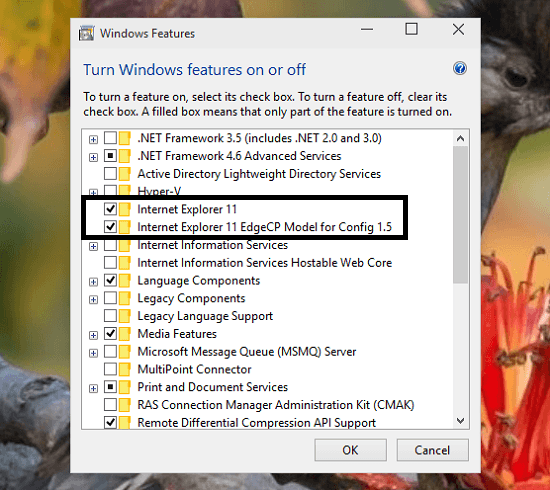
2. Now a new windows will open in which you will see all the features of Windows. You just need to look for Internet Explorer. By default its checkbox is marked, you need to unmark it.
3. Once you unmark it. Internet Explorer will give you this warning:
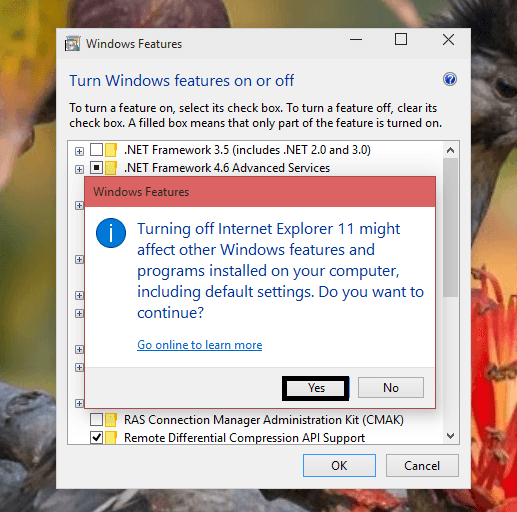
Turning off Internet Explorer 11 might affect other Windows features and programs installed on your computer, including default settings. Do you want to continue?
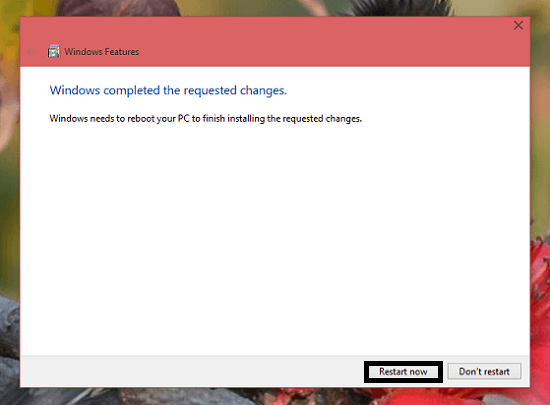
4. Windows immediately gets to work searching for the required files to disable the Internet Explorer. Now in just a few seconds, you will see a window asking you to reboot. Before you click on Restart Now option, save all your documents.
Now when you restart your PC, everything will look the same except that the abominable IE icon is no longer wasting valuable space on your taskbar. It’s not available on your Start Screen anymore, either.
Keep in mind that as your computer has no longer has a default browser, you might get a message about an “application not found”. So make sure to have an alternate browser like Chrome or Firefox before you uninstall IE from your system.
Steps to Re-install Internet Explorer in Windows 10
At any point you want Internet Explorer back in Windows 10, then you can also do that. You just need to follow the steps below:
1. Just like mentioned above in the tutorial, launch Turn Windows features on or off.
2. In this window, you will see the list of all the features installed on Windows 10. You need to look at these two:
- Internet Explorer 11
- Internet Explorer 11 Edge-CP Model for Config 1.5
3. You just need to “Check” the box on the side of these two options again and when a popup comes up click on Yes.
4. Now restart your computer, and you will see Internet Explorer is performing fine in Windows 10
So these are simple and easy to use steps to uninstall and install Internet Explore in Windows 10. Why don’t you give a try to this tutorial and let me know if you need any help related to a tutorial.