Blogger is well known free weblog publishing tool from Google that let you share blog posts in the form of text, photos, and video. Even this amazing blogging platform provides you themes or templates and widgets or gadgets.
If you’re using this blogging platform to earn money by monetizing website or blog using Google Adsense. Blogger.com is an amazing platform for bloggers who don’t want to purchase custom hosting and domain, but if you don’t know how to code, then you may find it difficult to customize the design the way you want. Also, you won’t be able to place ads in particular area of the theme to get more clicks.
On my YouTube channel, I daily get lots of queries regarding blogger.com customization and one of the most popular question which is asked by lots of users is “How to Place Google Adsense Ads below all blog post titles?”.
Now the question is, why lots of people want to place ads below the title in the blog post. The answer is very simple, this is the place which gives you higher Click Through Rate (CTR) as compare to other places.
You will find lots of tutorial on the web that teach you to step by step tutorial to add ads below the title in blogger, but still people fail to get the positive result because those old tutorials are not working anymore because of New Blogger Template Editor.
By keeping this thing in mind I decided to create an updated tutorial that is working fine and using which you will able to place Google Adsense ads below post title in Blogger.
Steps to Place Google Adsense Ads below all blog post titles
Create Ad Unit to Place Below Title (First Part)
1. Go to your Google Adsense account.
2. Here you need to create a new ad unit.
3. The Google Adsense team recommends ad size like 336*280 Large Rectangle for better result under title. But still its all your wish which ad type you want to place.
4. Once you’re done with an ad customization click on save and click on get code button.
5. As you are adding this code to blogger.com you need to parse this code from HTML to corresponding HTML entities. There are lots of tools available over the web, this tool work fine for me.
Note: Ads won’t appear, if you don’t follow above step.
Place Google Adsesne Ad Code in Blogger (Part Two)
1. Go to your Blogger Dashboard.
2. Here on this page, click on Template option and click on the Edit Html option and you will get new Template Editor page.
3. Press Ctrl+F and you will get a search box.
4. Now using the search box, you need to search the below code i.e.
<data:post.body/>
Make sure, you see the search code in the template code editor and not for the complete page.
Note: This code exist so many times in the template code, you need to look for the third one.
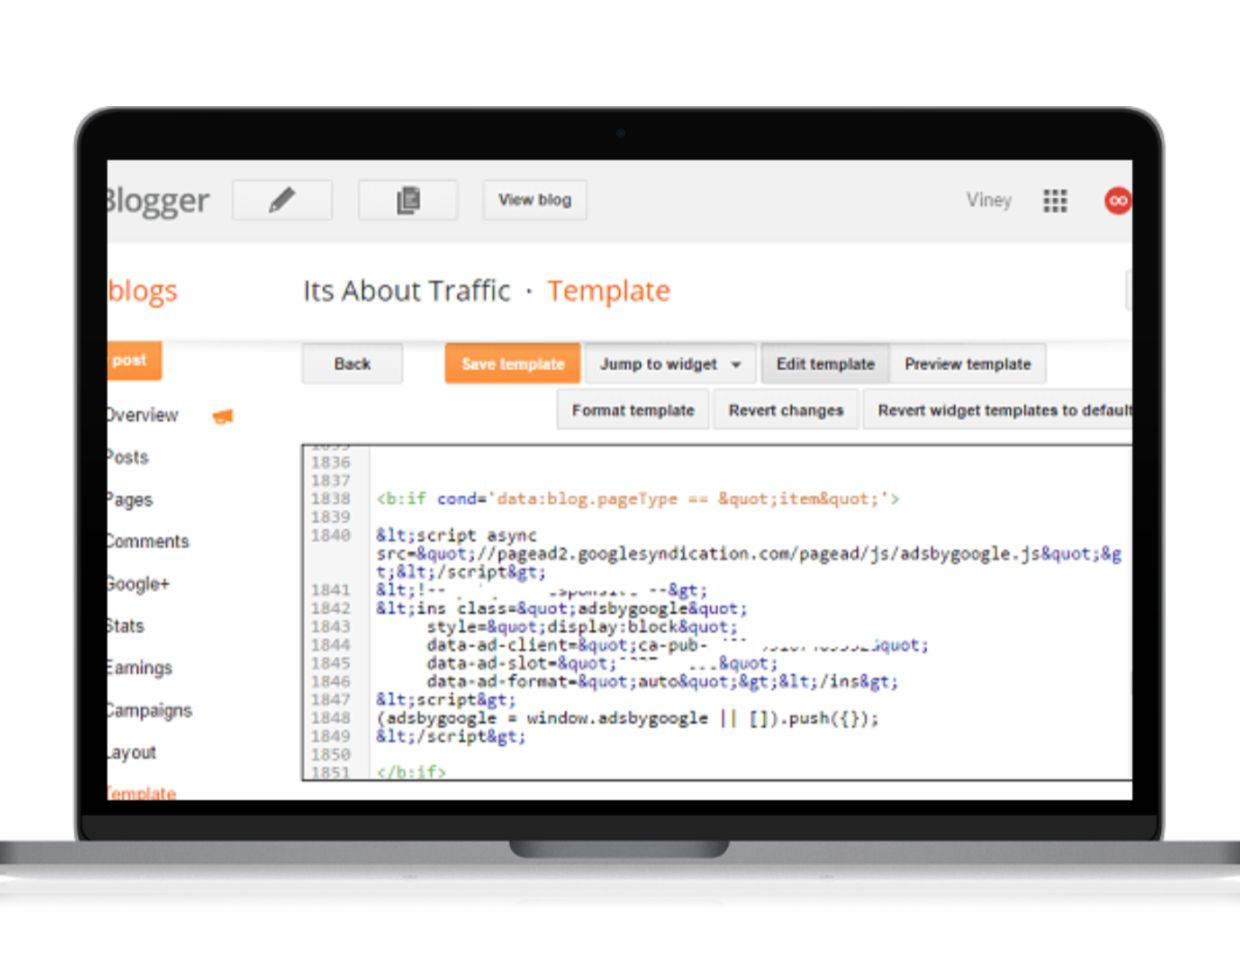
5. Once you able to find the above code, what you need to do is Copy the below Code and Paste it above the code you search for in step four.
<b:if cond='data:blog.pageType == "item"'>
Put Your Ads Code Here
</b:if>
6. Now all coding will look something like this:
<b:if cond='data:blog.pageType == "item"'>
Put Your Ads Code Here
</b:if>
<data:post.body/>
7. You just need to replace the Put Your Ads Code Here with parse Adsesne ad code which you created above.
8. Save the template and open any post of your blog.
Now if you follow everything just like shared above, your Ads will only be shown on the Post Page. So give try this step by step guide and let me know. Also, if you have any question regarding this guide feel free to ask me in Comment Box. You can also use Contact Us page for related queries.
![Read more about the article Best Websites to Watch the Oscars Live Online [Official Sites]](https://whatswithtech.com/wp-content/uploads/2022/06/best-websites-to-watch-the-Oscars-1-300x232.jpg)